Data, data, data. It’s hard to imagine a corner of our lives that isn’t in some way tied to its collection, aggregation, or monetization. Even our bikes, often the preferred get-away vehicle from an increasingly computer-driven world, aren’t fully off the grid anymore. But is that so bad? If we could collect enough data about our own bikes and how we ride them, could we make ourselves faster, more consistent, or more confident? One need only to look to the World Cup downhill scene over the past few seasons to find riders trying to do just that.
While the use of data acquisition systems is nothing new - I remember seeing them as far back as the late 90’s - it’s only recently that they’ve become an indispensable tool for race preparation. Take a quick walk through the pits and you’ll see more than a dozen different systems all going about similar business using slightly different approaches. Talk to the riders or the mechanics and they’ll all give you the predictable story about how data acquisition helps with bike setup, but they hold real details closer to the chest. Aside from top-tier racers, their mechanics and engineers, most of us are left to guess at what that spread of sensors is measuring or what the graphs they generate might mean, let alone the dark art of converting all of that information into an optimal setup. If you’ve puzzled over all this computing power as much as we have, you’re in luck. Legendary World Cup mechanic-turned-data-guru, Dave Garland, invited Vital to a private test session with his latest Stendec Data Acquisition System to see if all that data could actually improve my setup and my riding.
The Stendec system might look familiar, it’s been under development with various teams and riders for the past four years. Early versions of the system was used extensively by the Giant Factory Off-Road Team and later by Danny Hart and Saracen. The current, finished version can be found on the bikes of Troy Brosnan and the entire Canyon Factory Team.
Stendec Data Capture
Individual maximum, minimum, and average readings for:
- Front and rear axle travel
- Front triangle stability
- Front and rear brake pressure
- Rear wheel speed, lockup, corner arc
- Front end dive and rider-induced suspension input
- Lateral movement, acceleration and deceleration.
Stendec Data Features
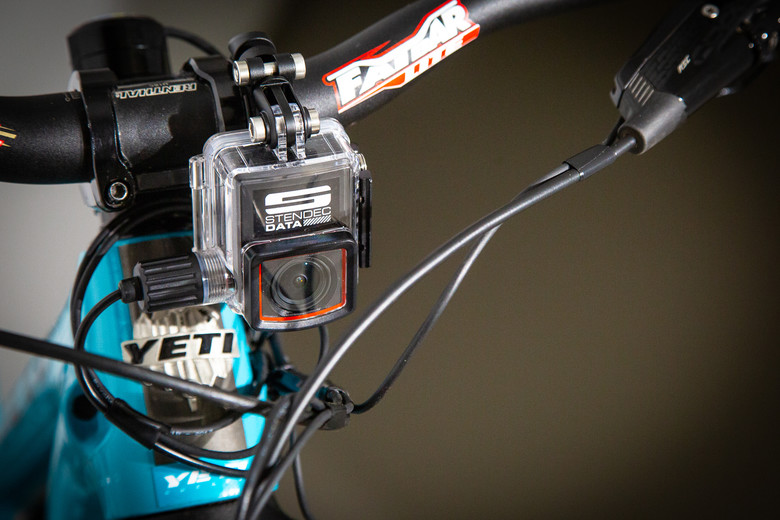
- Dedicated 4K camera synced with all data traces that allows rider and technician a real-time view of the data as it relates to specific incidents or track features. Can assists in remote tuning when rider and technician are not physically at the same venue.
- Programmable, expandable logger unit.
- User definable. All graphs can be selected by user or programmable by group depending on required view.
- All graphs can be paired or overlaid with any other related graphs for comparison and analysis.
- Configurations for racing as well as R&D industry programming for prototype testing.
- Detailed pathways for users to understand the correct way to read all data for racing, testing, or R&D.
- At purchase, a full day of training is included with Stendec Data. This is all that is required for you to start using the system efficiently. Further in-depth analysis training is available if required.
- Weight: 300 grams approximately.
- Price: Contact Dave Garland for pricing.
- Availability: Ready for order now, lead times vary for internal routing or surface-mounted systems.
Setup and Installation
Let’s clear up some confusion regarding terminology before we dive in. You’ve probably heard these tools referred to as "telemetry systems." That is incorrect. Telemetry refers to the process of wirelessly transmitting information to a remote location, but telemetry is not the process by which the data is collected, aggregated, interpreted or presented. The more accurate term is "data acquisition system" or DAQ, as that more precisely describes what these systems actually do.
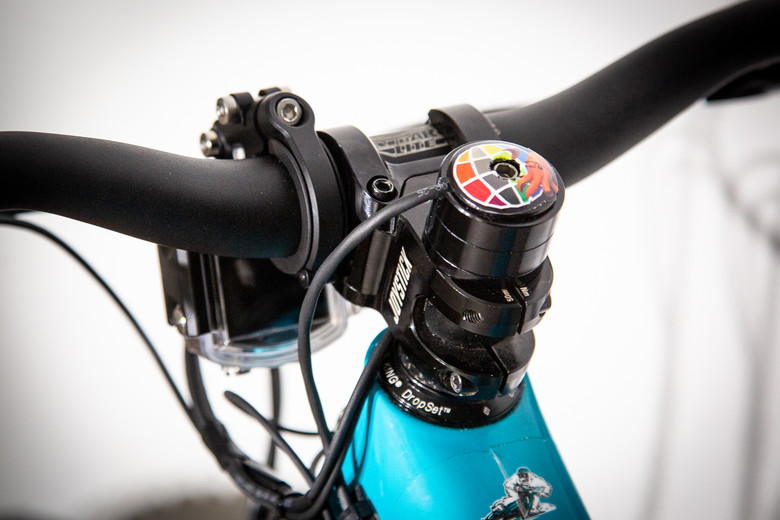
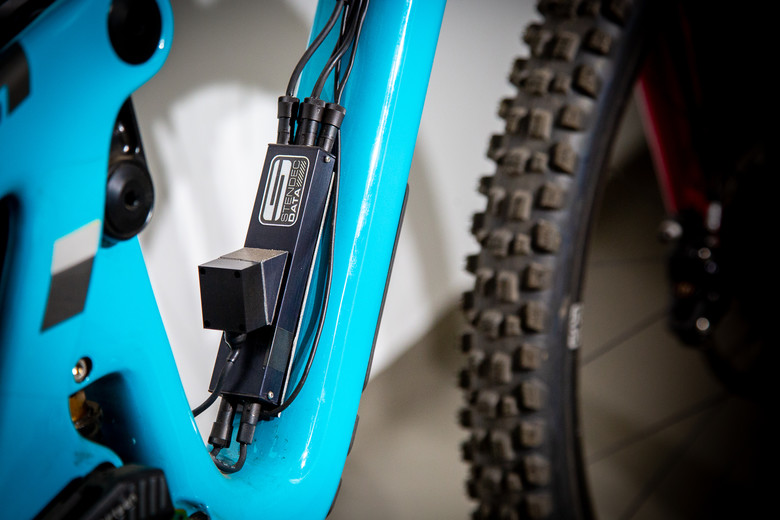
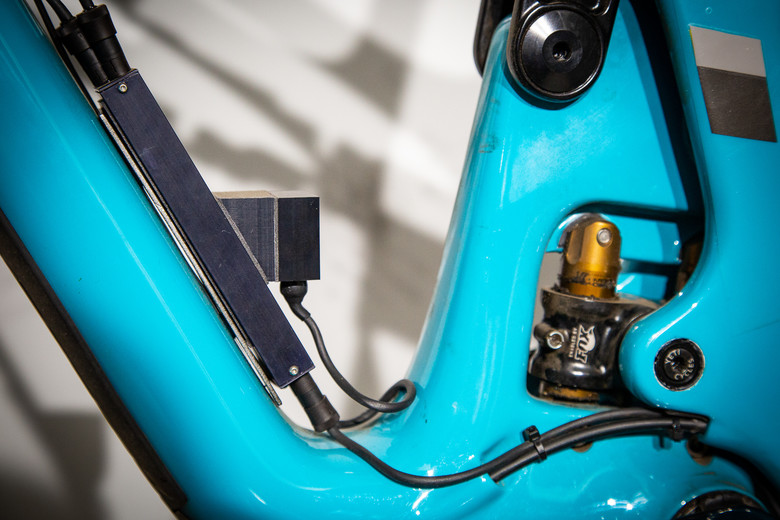
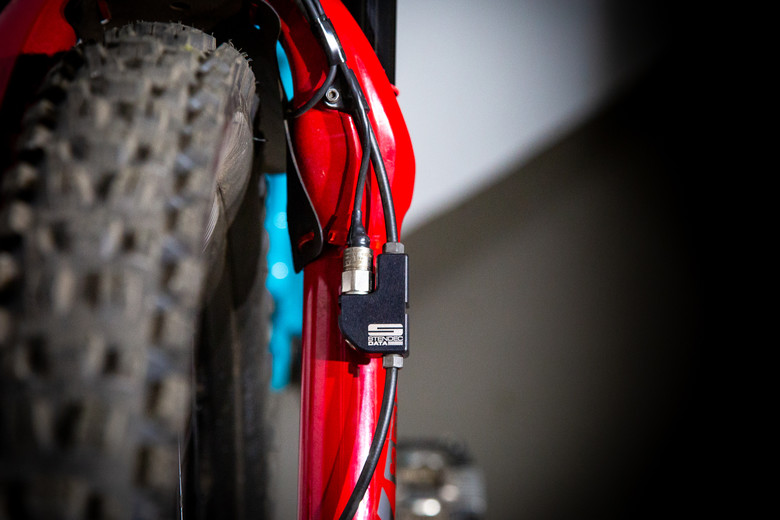
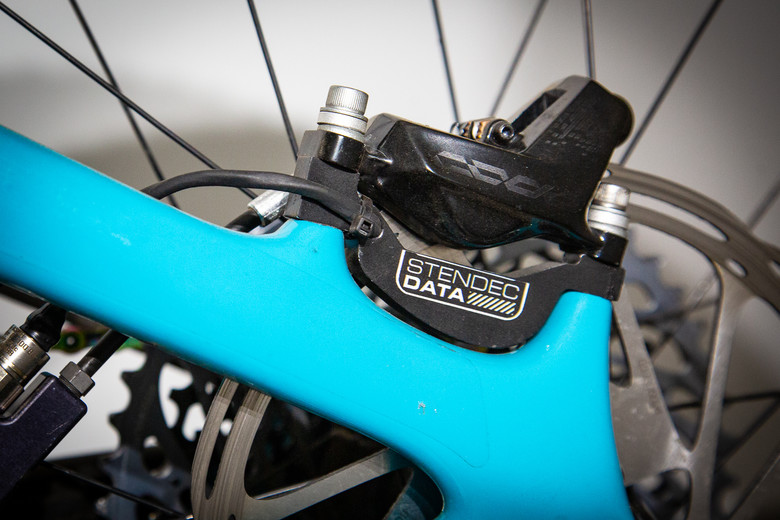
We wanted to eliminate as many variables as possible that could affect the results, so the test session was done at my home trails and on my personal bike; Berlin, Germany using my Yeti SB150 (more on both of these a bit later). Installation, though an exacting process, looked straight forward enough, but truthfully I just made coffee while Dave did the work. The various sensors were attached to the bike with zip-ties and connected via cables to a central processor bolted to the frame’s water bottle mount. The most labor intensive steps involved cutting and re-bleeding the hydraulic brake lines to fit the in-line brake sensors, and the prior machining of a bespoke rear brake mount that interally housed several of the rear wheel sensors. Compared to other systems I’ve seen in the World Cup pits, this one is highly refined and integrated rather seamlessly into the bike. If this had been a more permanent set-up Dave could have further trimmed and hidden some of the wires, but even with everything routed externally at full length, the appearance is quite tidy.
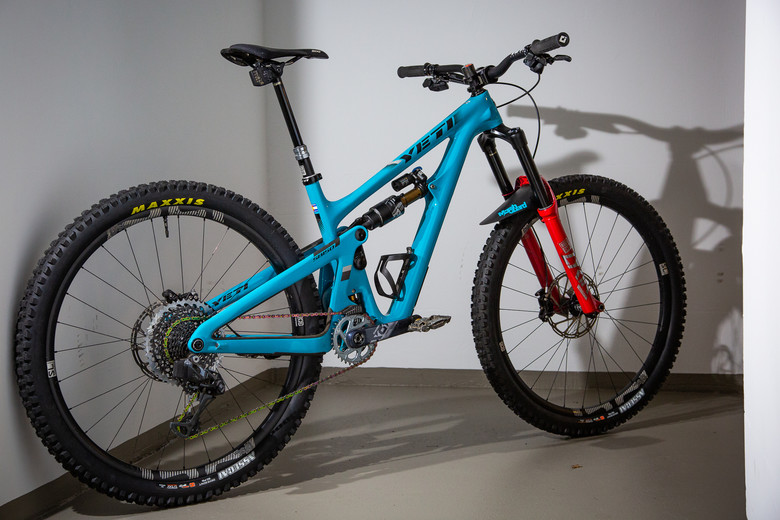
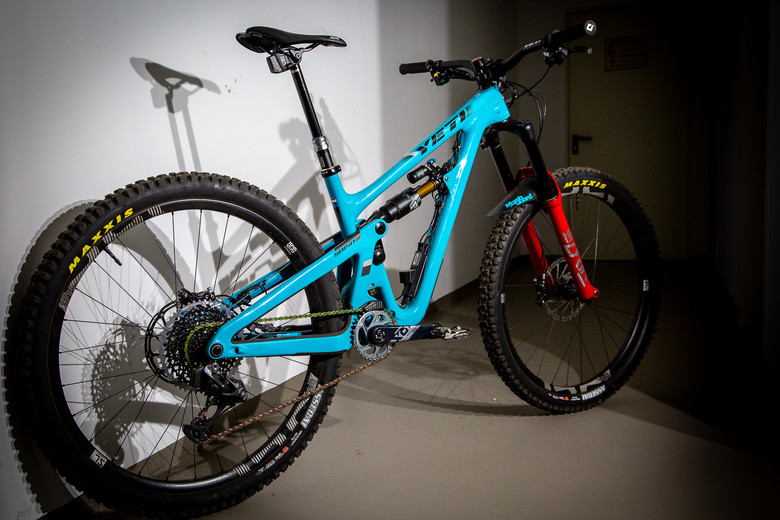
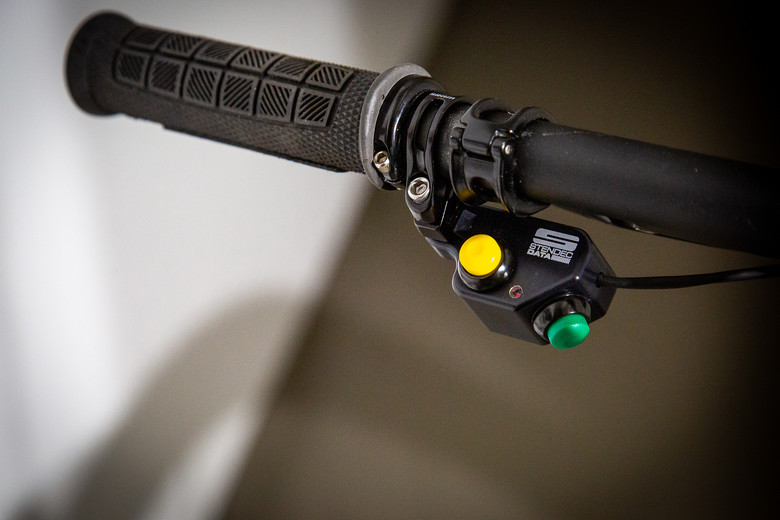
All told, six sensor locations were installed to measure front and rear axle movement, fork and frame dive, vertical chassis movement, lateral chassis movement, lean angle, corner arc, wheel speed, rear wheel lock-up, brake timing, and brake pressure. These were all synced together along with an in-line 4K camera mounted to the handlebar. This latter feature allowed us to see precisely where on the track the data we were seeing was collected. Thanks to the camera, settings can be analyzed and refined remotely. Dave has done so for some early season test sessions down under.
Testing Location and Conditions
It was time to hit the local trails now that the system was installed. We conducted our testing at Teufelsberg, a 300-foot-tall man-made mountain of World War II debris topped with an old spy station that probably once housed a fraction of the modern computing power bolted to my bike frame. The trails here aren’t particularly long, nor super gnarly, but they are generally high speed with a good variety of different features: flat corners, bermed corners, g-outs, off-cambers, switchbacks, and rough braking sections. I ride these tracks a dozen times a week, I know every inch of them, and can punch out consistent runs within 1 second of each other all day. Any change to my lap times, control, or feeling on the bike would be a direct results of changes made based on data rather than gradually gaining confidence as I learned a new track.

The weather remained dry and cool for the duration of our test session, so there were no concerns about comparing data from different days or factoring in deteriorating track conditions that could have affected my times. With installation and filming duties taking up most of the first day, we opted to log a couple runs in the evening. We headed home to see if there wasn’t anything immediately apparent we could change ahead of a full test session the following day.
What Did the Data Tell Us?
Three things jumped out at Dave immediately: I was dragging my brakes far too long and too deep into the corners, the fork was using much of its travel too quickly, and the rear shock was spending too much time sitting into the deeper part of its stroke. This imbalance in the suspension was resulting in a see-saw effect at the chassis, a steepening of the bike's geometry at the entrance to corners, and a slackening at the exit. The graph comparing the two sensors of the fork showed that my own weight and brake dive was pushing the crown down far in excess of any bump forces. Aside from the braking, which I could identify on my own, the suspension movements were almost imperceptible had they not been pointed out; the difference between going by ‘feel’ as opposed to readings from sensors that can record minute changes every .016 of a second.
This is what brake dive and excessive rider input at the fork looks like. Ideally the two graphs should look quite similar the majority of the time.

What We Changed on our Fork and Shock
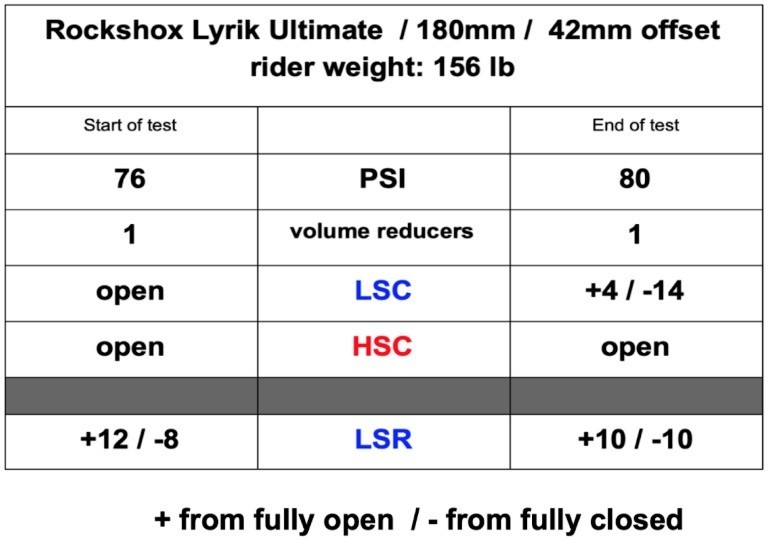
The remedy Dave suggested was a combination of more air in the fork (we eventually worked our way up from 76 to 80 psi), and adding more low-speed compression (LSC) from what had previously been a fully open setting.

Compared to the previous graph, the forces at the front end are beginning to equalize. Bumps aren’t pushing the crown up (too stiff) and I’m not pushing it down in excess of the bump force (too soft/brake dive). The difference between the previous graph and this one was the result of a change from 78 to 80 psi and from 0 to +4 LSC.
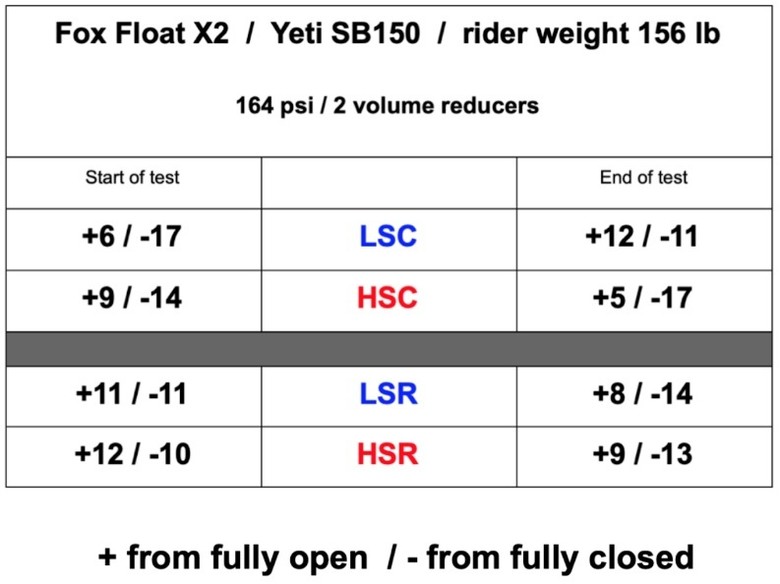
Because the track here is fast and relatively smooth except for several sharp, small bumps, we didn’t need to rely heavily on the suspension to deliver traction. That job would fall more to the tires, the bike’s dynamic geometry, and rider input. By increasing the LSC while leaving the high-speed compresson (HSC) open, the fork still handled all the sharp hits but provided much more support under braking and under heavy cornering forces. At the rear, we left the air pressure alone since we were already sitting at 30% sag which is just under Yeti’s recommended 33% for the SB150. To help counteract the wallowing, we significantly reduced the shock's high-speed rebound (rebound speed from when the shock is compressed toward the end of its travel and spring force is greatest), and added a few clicks of LSC to help the shock sit up a bit to resist input from shifts in my body weight.
The SB150 is not designed to be extremely progressive, with the approximately 2.5:1 leverage ratio increasing about 15% towards the end of the stroke. The rationale being that we ‘only’ have 150mm of travel so we want to be able to use all of it, as opposed to a more progressive setup that might resist bottoming but would limit use of full travel. The other benefit of a more linear shock rate is that any adjustments remain consistent throughout the stroke, so we could really rely on the built-in tuning capabilities of the Fox Float X2 to get things dialed fairly easily.

Ideally the graphs of the front and rear axle should be similar, so we continued to add LSC to the rear damper to see if we could get the bike to sit up a bit and better balance the settings on the fork. Looking at the data each run, we continued to increase LSC on the rear shock one click at a time until the graphs of the front and rear axle movement began to come into alignment.

By the end of our fourth run, the graphs were tightening up and the bike was feeling significantly better.
Below: Suspension settings at the start and end of testing (adjustment position shown from both fully open and fully closed depending how you prefer to count your clicks)
Braking Technique
Correcting the braking would be fully up to me. Dave suggested focusing on trying to smooth out the corners rather than trying to get into them as fast as possible. Brake hard and quickly, and let off the brakes before the apex to let the bike’s geometry normalize and carry speed through the exit. Even done slowly, he predicted it would be faster than my current technique of just slamming into the corners as fast as I could and then limping out with no momentum.
I practiced this new braking technique at the beginning of the next test session before logging full length runs. It took a few tries, but the difference was profound. What felt like over-braking into the turns was followed by fully releasing the brakes and an acceleration through of the corner exits. I had an easier time steering toward the outside of the next corner, meaning I was both going faster and less likely to square off the next apex. It was only 5 corners, but my arms were far less tired and my breathing was more relaxed. By not riding the brakes hard into each apex, I needed less effort to control the bike and didn’t need to to hold my weight up as the braking forces collapsed me into the front of my bike.

Did Data Acquistion Make a Difference?
Combined with changes we made to the suspension, the difference in my perceived level of speed and control was remarkable. The stability of the bike could be felt immediately and the sense of corner speed was significantly greater than I’d experienced previously on this track. And because the additional speed was paired with more control, the bike felt easier to handle. Not only did I start off feeling faster, but my body position on the bike changed slightly. With the added support at the rear damper I could stand a bit harder on the pedals through the corners ,which in turn caused my chest to move forward and down slightly into a more aggressive position.
All told, after just four logged runs I ended up going almost 3 seconds faster on a 1-minute track I’d ridden hundreds of times. Now what percentage of that time was a result of bike setup and what can be attributed to better braking technique would be difficult to call, but a 5% decrease in time is massive either way. Canyon Factory Team riders, who have far better braking technique than me reported a similar time gain but over a longer 2-minute test track. Imagine gaining that same advantage at the recent World Cup in Maribor, a track with many of the same characteristics and suspension requirements as the one we tested on, and that becomes 10 to 15 places on the results sheet. Additionally, consider that World Cup riders will tell you that one of the most important parts of practice is getting up to speed with dialed race settings as quickly as possible. It’s no wonder more and more riders are sporting DAQ-equipped bikes in practice. Time not spent guessing at setup or making bad tuning decisions is more time spent on quality race-pace practice.
What Was Gained From the Stendec Experience?
Aside from learning first-hand how a DAQ system is used to quickly optimize bike setup and rider input, I saw an image of my riding that’s just not possible through photos or video. I knew I braked late through lots of the corners, but I didn’t think it was that late and definitely not that hard. But the data here doesn’t lie, and armed with that info, I had a targeted goal to work on the second day of testing. These sort of habits die hard though, so this will continue to be something I’ll have to focus on every ride.
In terms of suspension setup, I’ve always known what LSC does, but for most part I only used it to address brake dive on steep terrain. I’d not spent any time using it to tune out my own input to the fork or tried to match the effect at both axles. In tuning the rear shock, I’ve most likely ruled out - at least for now - significant increases to air pressure or the need for a third volume reducer, meaning any future tuning becomes more simplified with fewer variables to account for. While I’ll definitely still experiment with air pressure and volume, I gained a solid base setting that I can always come back to should future adjustments go awry.
What Wasn’t Gain From the Experience?
The data can’t correct my bad habits or poor technique, only identify them and try to quantify them in terms of lost time or reduced stability and traction. Unfortunately it’s not the sort of thing that can be tuned out with a few clicks. It’s also important to point out that I didn’t achieve a perfect suspension setup that I can set and forget for the rest of the season. This track was fast, at just under 25 mph average speed, with relatively small, hard bump forces, and less need to rely on the suspension to keep traction in the corners. This meant we could put a premium on chassis stability. We added quit a bit of LSC at both ends without the bike feeling as if it could no longer track the ground effectively. We were looking for the most optimized setup for this track, and that’s exactly what we got. However, by using the data collected from each run to get there, we know precisely why we made each adjustment and what it did to the handling, meaning we can also undo this setting strategically for a different type of track without starting from scratch each time.
We were looking for the most optimized setup for this track, and that’s exactly what we got.
Ideally, this same testing protocol would be repeated on several tracks of variable length, terrain, and conditions. The settings and any changes that were made would be recorded for future reference.
What I’ve Changed Since the Testing
It’s worth noting that our testing was done in unseasonably cool weather (about 55 degrees), and that at most, I had about five days ride time on the SB150. So it’s a given that further adjustments would be needed for different terrain, warmer temperatures, and simply getting up to speed a bit more on a brand new bike.

Two weeks after testing I raced the first round of the EWS European Continental Series in Spain, on much slower and far more technical terrain. Initially I left my setup the same, but after a bit of practice I could tell the handling was suffering a bit. All that LSC giving us stability on my high-speed track was preventing the suspension from moving easily enough to absorb the slow, bouldery terrain on some of the stages. Instead of smoothing out the bumps, the fork tended to ride up and over the rocks then wobble a bit on the backside due to the relatively slack head angle. -2 psi and -1 click LSC at the fork took care of the steering flop, and -2 LSC at the rear was done to keep things balanced. I also slowed the fork rebound down by +1 click due to much warmer temperatures.
While this was done without the help of the DAQ system on the bike, the tuning choices were a direct result of what we had learned from it a few weeks prior. Heading to the EWS in Madeira the following week, I left the rebound unchanged from the ‘hot weather’ setting but put 2 psi back into the fork because I knew the terrain there would steeper and set the LSC to +4 as we had tested. I also went back to a 170mm Lyrik as the longer 180mm singlecrown 29er fork coupled with a generously slack 64 degree head angle felt like it loaded the bushings in some situations.
While I found the firm compression settings ideal for the first few stages in practice, I was quickly reduced to passenger status as the bike became too difficult to handle when fatigued or when I didn’t nail my exact line. As both fatigue and rider error are a baked-in trait of EWS racing, I ended up reducing the LSC in both fork and shock by -2. I also added slightly more LSR in the rear to help the bike sit down more on the steeper terrain. Nothing radically different, just small, incremental changes that didn’t stray too far from the base settings but offered a slightly calmer, more forgiving ride when totally gassed. The only adjustments I made during the 8 different race stages was to go back to the original test-session compression settings front and rear for the Gamble stage, then dialed them back again for the next four stages of the day.

Post-EWS and with a few weekends spent at the bike park, I have since added pressure and a third volume reducer to the rear shock. In theory at least, this is done to use the spring for extra support rather than the damper (the former stores and returns energy, the latter dissipates it), meaning the shock still sits up a bit higher but without relying as much on the LSC circuit. The difference is subtle but could be described as slightly more playful and dynamic (support via spring) as opposed to more stable and muted (support via LSC damping). I’m not sure which one I prefer, but with racing in mind I’ll probably opt for the most current setup. It’s easy to make any damper adjustments trailside, but fiddling with reducers and air pressure isn’t going to be a viable option during a race.

What’s the Bottom Line?
Do you absolutely need DAQ to ride better or set up your bike correctly? Of course not. A bit of quality coaching, tips from a knowledgeable tuner, and time spent self-testing different settings can point you in the same direction. It might even get you to the same place. But it’s going to take a bit longer and possibly involve a bit of guesswork and some mistakes. This, too, isn’t all bad as there’s definitely something to be gained from experiencing how making certain adjustments can adversely affect your bike’s handling; it’s part of learning what all those knobs actually do.
Can a DAQ system help improve your riding? Definitely. Can it quickly and precisely improve your bike setup? Absolutely. Is it worth the investment? Only you know how to answer that.

If you want to get in touch with Dave to learn more or look into acquiring the Stendec system:
Contact: Dave Garland, Stendec Data, +44 (0) 1352 710999
www.Stendecworks.com
www.StendecData.com
www.StendecRacing.com
info@stendecworks.com

Questions with Dave Garland:
Who do you envision using or purchasing the system, is it just for racers?
Stendec data has been always intended for anyone who is in racing as a main focus. I began to see the sport of DH evolve, in recent years we have seen winning margins go from seconds to thousands of a second which is why I started this project, but as an expandable, updatable tool it has become apparent that the power of this system can be far-reaching and accessible to almost anyone who wants to further their knowledge base. Especially regarding geometry and weight distribution, which largely govern suspension movement, key factors in any setup.
Will you be making your services available for test days for privateers?
I try to make myself as accessible as possible, this time of year is a bit challenging with that but I am always available to discuss whatever a rider's issues may be. The thing is, test days are very subjective to the surface you are riding on, you really have to ride a number of surface types to gain a general setup knowledge, one can’t really produce enough to rubber stamp a setup. Stendec Data is designed in such a way that every time you ride you pick an objective, set the parameters that you need to analyse then practice against those parameters, you can then overlay multiple runs to show improvements gained.
Can Stendec Data be used without the in-line brake sensors?
Braking is a very important part of this system as it affects so many parameters of a bike's setup as well as the rider input, everyone that has used SD has been amazed at what they do with braking without knowing it so it has to be a part of test days.

How have athletes benefited from using the DAQ system already?
The most revealing part of testing with SD is the interaction with the bike, it quickly uncovers inputs from the rider that cost time. In pre-season testing with amateur and pro riders alike, all have changed the way that they approach racing now, and that filters down to any rider at any level as our testing in Berlin proved in a very short space of time. Whether you find seconds, 100ths, 1000ths or a more efficient way of riding it can only be a benefit.
What you learned from testing with World Cup level DH athletes compared to someone like me of much more modest skills on a trail bike?
I think seeing visually what is actually happening to a bike at WC level at first was very revealing after many years of running through problem solving in my mind, seeing everything illustrated allowed me to make isolated adjustments to solve individual problems without largely affecting other settings already obtained. Learning to listen to a rider, to go find on the camera and graph what they are experiencing can often lead to a non suspension related issue, that process does not change whatever level you are at as we found in Berlin.
One very important feature that became apparent is that is that a rider and technician can be on opposite sides of the world, be able to discuss the day's testing by looking at the camera and data together and decide what needs to be worked on, for example Canyon's Nigel Reeve and Mark Wallace have regular discussions on setup whilst being on opposite sides of the world.
Feature by Lee Trumpore, photos by Lee Trumpore, Sven Martin and Dave Trumpore


View replies to: Can Data Acquisition Make You a Better Rider? We Work with Stendec's Dave Garland to Find Out
Comments